Schedule a call
-

UX Prototyping

In this article

What is UX prototyping?

When designing a product and its user experience, designers often create a representation of the final product – also known as a prototype – for user testing. This step, called UX Prototyping, is part of the design thinking process, which is often used by UX designers when developing new products or redesigning existing ones. Comprising five key steps: ‘empathise’, ‘define’, ‘ideate’, ‘prototype’ and ‘test’, this iterative process helps designers to create a product that aligns with users’ needs and wants.

UX prototyping is hence integral to the design process for several reasons: Firstly, it helps stakeholders visualize how the final product will look and function. Secondly, it allows users to provide feedback on the flows and ease of use of the final product. As such, this can save the client (and designers) a lot of time and money, as necessary edits based on user feedback can be made early on during the prototyping stage, instead of having to carry out a full rehaul of the entire product just before or following its launch.

How is prototyping carried out?

Typically, designers will first go through a process of rapid prototyping to validate their idea. This involves quickly sketching out the main user interface screens and user flows, then adding interactivity to test the concept. For instance, one would at least map out the flows for the landing page UX, progress bar UX, checkout UX or back buttons UX for apps or websites.

Here, moodboards are also integral to set the overall feel and aesthetic of the product. Moodboards are a collection of images and colours which align with a chosen theme – hence, they are used to visually define the vibe of your final product and provide further creative direction (if required) for designers when choosing the style or colour of certain features, such as buttons or fonts.

Prototyping can be carried out in many ways, and there is no “right” way to create a prototype. In the next section, we will go through the different types of prototypes and how they are mapped to fidelity.

Examples of moodboards from Straightline Technologies and Nicolás J. Engler

Types of prototypes

Prototypes are often classified into two categories: “high-fidelity” and “low-fidelity”. Fidelity is a term used to describe how closely the prototype resembles the final prototype. The choice of fidelity type is often dependent on several factors, including how advanced the designer is in the design process, resourcing, and the purpose of the prototype. For example, if the intent is to provide the client with a rough idea of how the app would look like and its user flows, a low-fidelity prototype could be enough. However, high-fidelity prototypes would be more suitable should we want to carry out a realistic simulation of how potential users would interact with it.

Meanwhile, the form (or type) of the prototype can vary widely and includes:

  • Wireframes
  • Sketches or paper prototypes
  • Digital prototypes
  • Coded prototypes

However, it is also useful to note that most of these types of prototypes can be categorised as both high or low-fidelity, depending on how detailed they turn out. Nevertheless, more complicated forms like coded prototypes have a tendency to be high-fidelity, while sketches more often than not fall into the low-fidelity space.

1. Low Fidelity prototypes

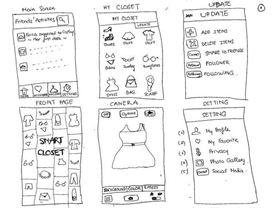
Low fidelity prototypes are often used as a quick, cheap, and fuss-free way of visualising a product and its user flows. The aim is to create a basic structure through which the designer can test out its usefulness and usability; hence, aesthetic design is less of a concern at this stage. Some examples of low-fidelity prototypes would include sketches/paper prototypes or click-through wireframes.

Sketches are often free-form pencil drawings. These types of prototypes are most ideally used when designers collaborate with product teams as they can easily be tweaked as and when changes are made. Sketches often feature most prominently during the early design stages, when new design ideas are being generated and quick visualisation is required. While sketches are often used for early-stage designs, it is also possible to have a high-fidelity sketch with a high level of detail!

Example of a low-fidelity vs high fidelity sketch

Alternatively, click-through wireframes and prototypes are another popular low-fidelity choice. These typically include the necessary or basic features for the app or website (such as the search key or checkout button). These wireframes are just a collection of individual pages which when put together, mimic a general user’s flow while they browse through the site. While click-through prototypes generally provide a better representation than paper sketches of the eventual digital product, they still look quite basic since aesthetics are less of a priority here.

2. High-Fidelity Prototypes

Once greater clarity on the project direction and desired end-goal has been obtained, UX designers will often opt for high-fidelity prototypes to better convey the design and flows of the final product. At this stage, aesthetic design features much more strongly and the focus is on ensuring the prototype behaves very similarly to the final product in terms of functionality, flows, design and responsiveness. Hence, this provides a more accurate representation of real-life user behaviour and interactions with the product, which in turn gives more useful feedback to be consolidated for any final tweaks or iterations.

Furthermore, clients and other external stakeholders are more likely to react favorably to a high-fidelity prototype, as they are better able to visualise and experience the “final product” that they are paying for. Nevertheless, high-fidelity prototypes are more expensive, time-consuming to make, and are harder to revise. Thus, they are preferred by designers only after the design and features have been fully firmed up.

Digital prototypes are often made with prototyping software, which offers high degrees of realism in the end-product. Examples of prototyping software that are commonly used include Adobe XD, Figma, or UXPin. Alternatively, prototypes can also be coded in HTML or CSS. Prototypes created from code tend to be the most realistic approximation to the final product and are ideal for an app or web usability testing. Having a grasp of these languages (HTML, CSS) is however required on the part of the UX designer, hence prototyping software is often the more accessible option for most people.

Conclusion

Although different options for prototypes have been discussed in this article, the exact type of prototype (wireframes, sketches, or digital) that is most suitable for you will depend on your project specifications and progress. Low-fidelity prototypes are best used earlier on in the design process, while high-fidelity ones provide a better payoff at the later stages. However, the key to the prototyping step is to ensure that user consultations and hypothesis testing is carried out after each iteration, to ensure that your final product will turn out its best!

We hope that this article has provided you with a better insight into UX practices, specifically prototyping. If you want to know more about user experience and its industry, do check out our other resources available on our websites, such as our articles, weekly webinars, and podcasts.

CuriousCore offers both a 2-day UX Design Course and a 4-month UX Career Accelerator for those keen on transitioning into the industry and working on real client projects. Click the buttons below to find out more.